Domain Authentication
You will need to add certain records to your DNS provider to allow app.atarim.io to send emails using your domain.
Please note: these records will not affect your original email setup, whether it’s on Gsuite or any other platform!
Why We Require Domain Authentication
Leaving comments on the pages means nothing if your messages don’t make it to the People you’re trying to reach. Although it’s just one piece of the deliverability puzzle (along with your overall reputation), authenticating the domains you use to send email from app.atarim.io can help your messages reach your users.
In addition to improving email deliverability, authenticating your sending domains in app.atarim.io will also let you control the appearance of your tracked links.
Step 1: Access Your Domain Authentication Settings
Description
To set up basic authentication you’ll need to add four DNS records at your DNS hosting provider for any domain you wish to send from using your account:
Instructions
- Log in to your Atarim dashboard.
- Click on Settings in the left-hand menu.
- Navigate to Email Settings and open the Domain Authentication tab.
- Locate the MX, SPF, and DKIM records assigned to your domain.
- Copy each of these records to use in the next steps.
MX Records: Two MX records are necessary for delivering email to your domain. MX (Mail Exchange) records identify which mail servers accept incoming email for your domain.
SPF Record: One TXT record that allows app.atarim.io to sign emails sent on your behalf. SPF (Sender Policy Framework) records identify which IP addresses are allowed to send email using your domain.
DKIM Record: One TXT record that allows app.atarim.io to sign emails sent on your behalf. DKIM (Domain Keys Identified Mail) signatures ensure that the message that arrives at the inbox provider is identical to the message that you sent.

Note : Each domain you choose to authenticate must first be used in the Inbox Email Address that is configured in your account. Once added, each domain will be assigned its own values for the DNS records that need to be added to your DNS host.
Step 2: Add DNS Records in Your Domain Provider
Description
To verify your domain, you need to add three types of records: MX, SPF, and DKIM. The following steps demonstrate how to add them in GoDaddy. The process is similar for other providers.
Instructions
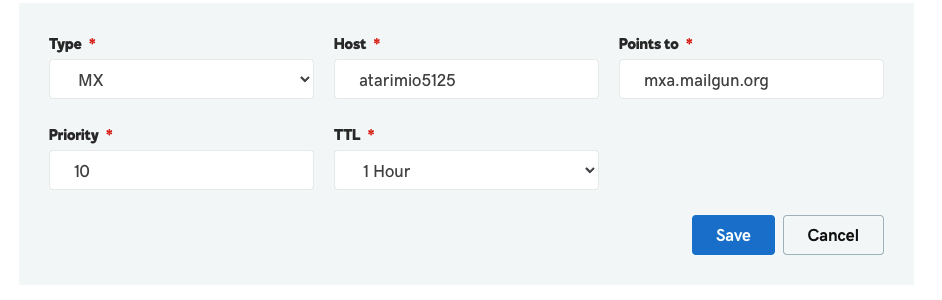
Adding MX Records (Mail Exchange Records)
- Log in to your GoDaddy Domain Control Center.
- Select your domain and go to Manage DNS.
- Click Add under the records table.
- Select MX as the record type.
- Enter the following details:
- For mxa:
- Host:
atarimio5125 - Points to:
mxa.mailgun.org - Priority:
10 - TTL:
60 minutes (1 hour)
- Host:
- For mxb:
- Host:
atarimio5125 - Points to:
mxb.mailgun.org - Priority:
10 - TTL:
60 minutes (1 hour)
- Host:
- For mxa:
- Click Save to apply the changes.
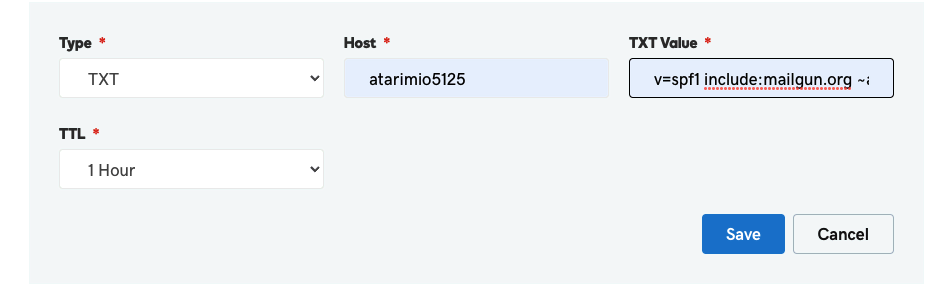
Adding an SPF Record (Sender Policy Framework)
- Navigate to the Manage DNS section of your GoDaddy account.
- Click Add under the records table.
- Select TXT as the record type.
- Enter the following details:
- Host:
atarimio5125 - TXT Value:
v=spf1 include:mailgun.org ~all - TTL:
60 minutes (1 hour)
- Host:
- Click Save.
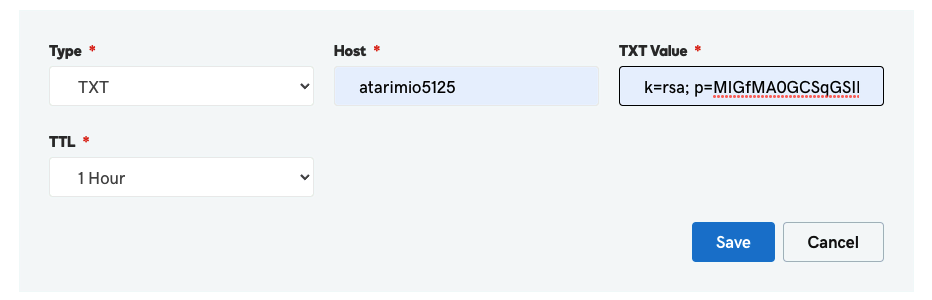
Adding a DKIM Record (Domain Keys Identified Mail)
- In GoDaddy, go to Manage DNS and click Add.
- Select TXT as the record type.
- Enter the following details:
- Host:
atarimio5125 - TXT Value: (Copy the full DKIM string from app.atarim.io).
- TTL:
60 minutes (1 hour)
- Host:
- Click Save.
Note: Please allow up to 72 hours for your changes to take full effect globally.
Step 3: Verify Your Domain in Atarim
Description
After adding the DNS records, you need to verify your domain in Atarim.
Instructions
- Return to app.atarim.io.
- Navigate to Settings → Email Settings → Domain Authentication.
- Click the Verify Domain button.
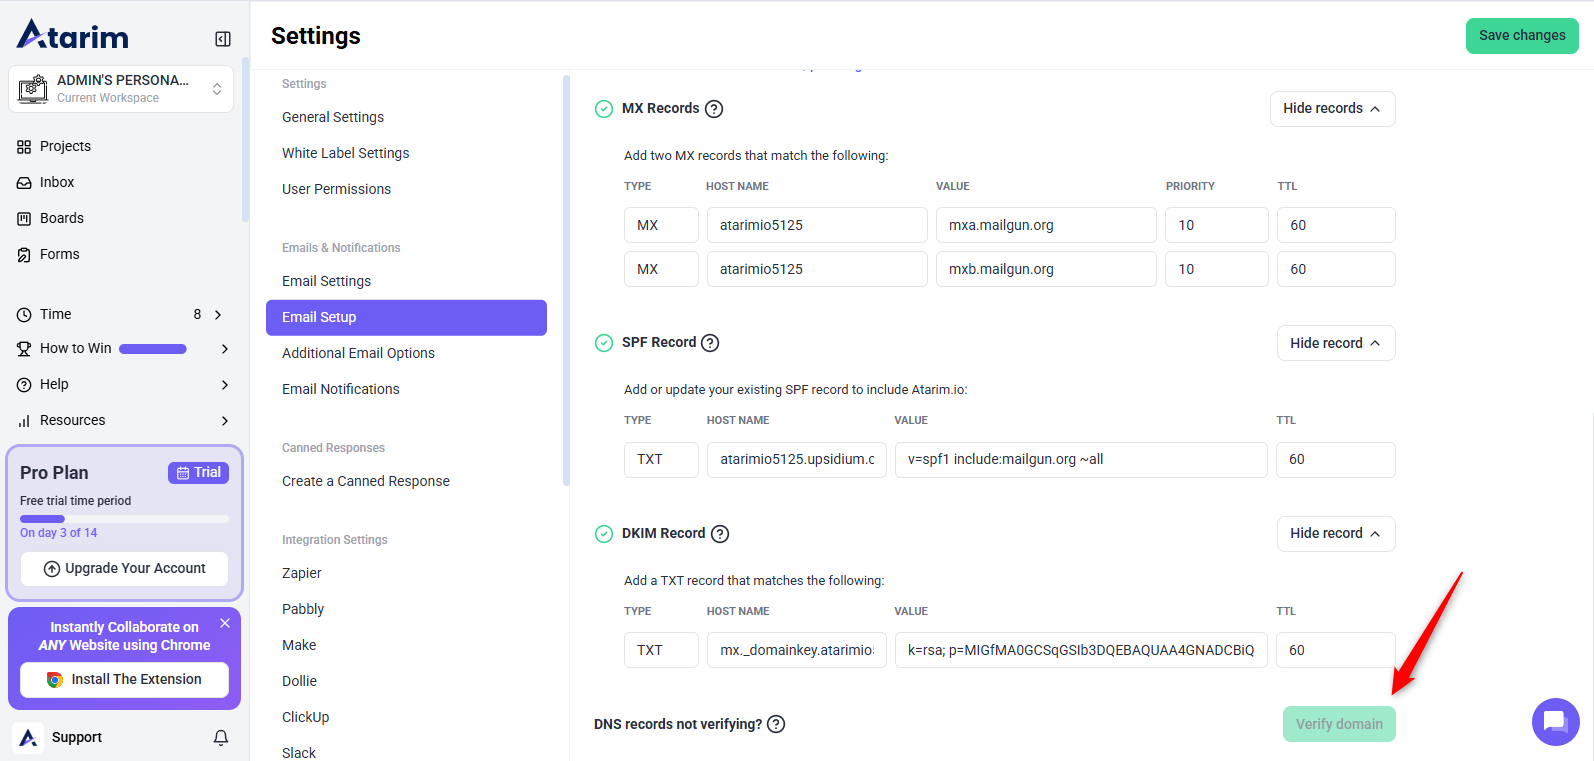
Tip: After you have added these records to your DNS host and they have had time to propagate, you will need to click the Verify domain button. We will verify that the records are in place and you’ll see the results of our check.
Resources
For your convenience, here is a list of links to the instructions for adding DNS records at commonly used hosts:
- 123 Reg – MX | TXT | CNAME
- bluehost – MX | TXT and CNAME
- DNS Made Easy – MX | TXT | CNAME
- DNSimple – TXT | CNAME
- Dreamhost – MX | TXT | CNAME
- DYN – MX, TXT, and CNAME
- GoDaddy* – MX | TXT | CNAME
- Hostgator – MX | TXT and CNAME
- Hover – MX, TXT, and CNAME
- Media Temple – MX, TXT, and CNAME
- Namecheap – MX | TXT and CNAME
- Network Solutions – MX | TXT and CNAME
- Register.com – MX | TXT | CNAME
Note : It takes up to maximum 72 hours for the domain propagation, if it does not verify quickly, kindly wait for 72 hours and click on Verify Domain Button again after 72 hours and your domain will be verified with green check on three of the records. If it does verify after 72 hours, you may have to contact your domain provider.
FAQs
Up to 72 hours, depending on your DNS provider.
Ensure all records are correct, wait 72 hours, then retry. If it still fails, contact your domain provider.
No, these records only affect email authentication for Atarim, not your primary email service.