Save time and ensure consistency with pre-written responses for emails, tasks, and visual collaboration.
Canned Responses in Atarim allow you to create, manage, and use pre-written message snippets to streamline communication with clients and team members. These responses can be used in emails, tasks, and visual collaboration, ensuring consistency and efficiency.
Relevant For
Project Managers
Prerequisites
Understanding of Inbox, Tasks, and Collaboration Tools within Atarim.
Access to Atarim’s Settings menu
Active Atarim Inbox or Tasks panel where canned responses will be used.
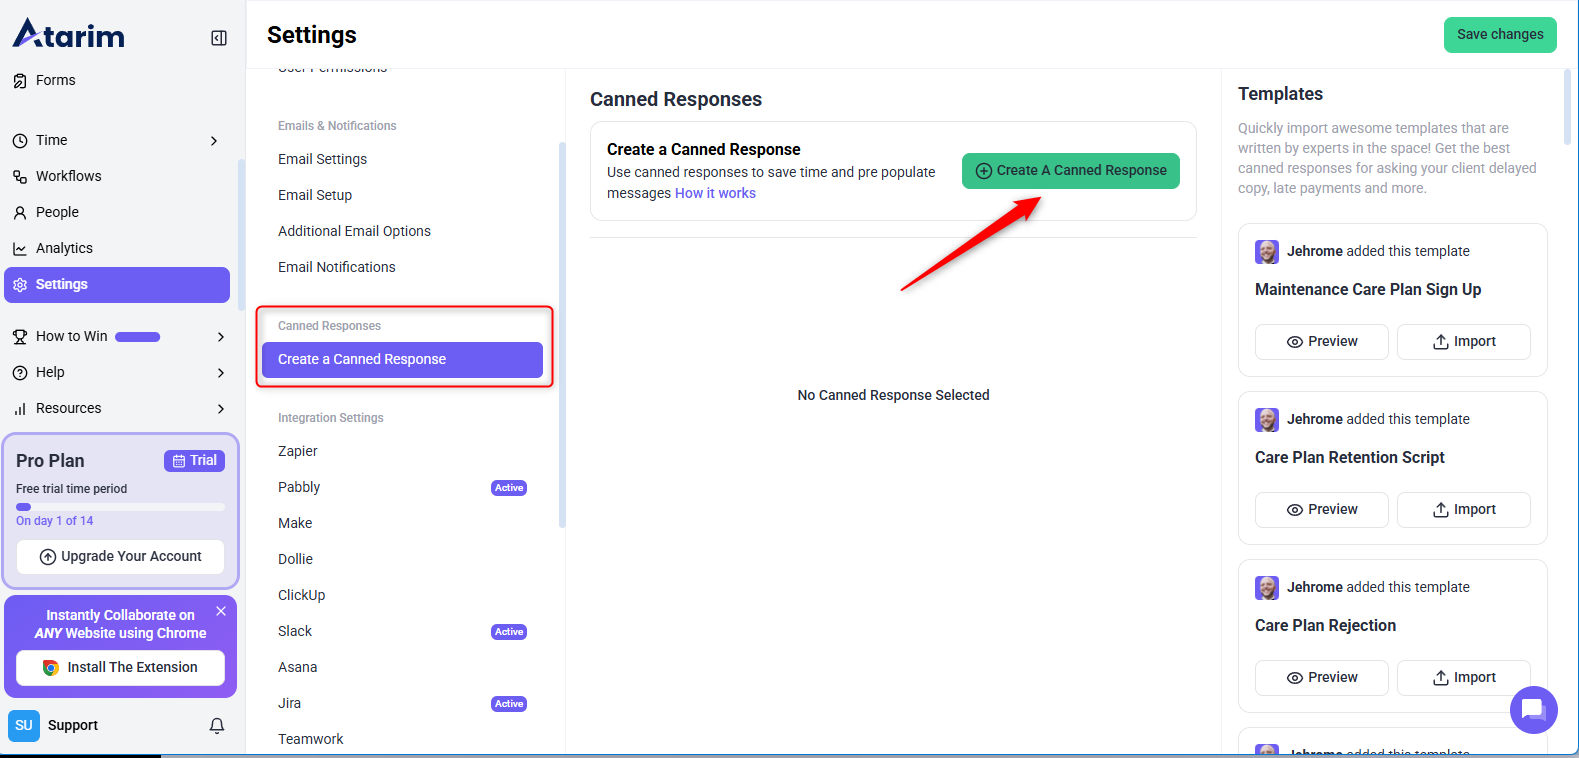
Navigate to the Settings menu in your Atarim dashboard.
Access the Canned Responses Section:
Under the Canned Responses category, click Create a Canned Response.
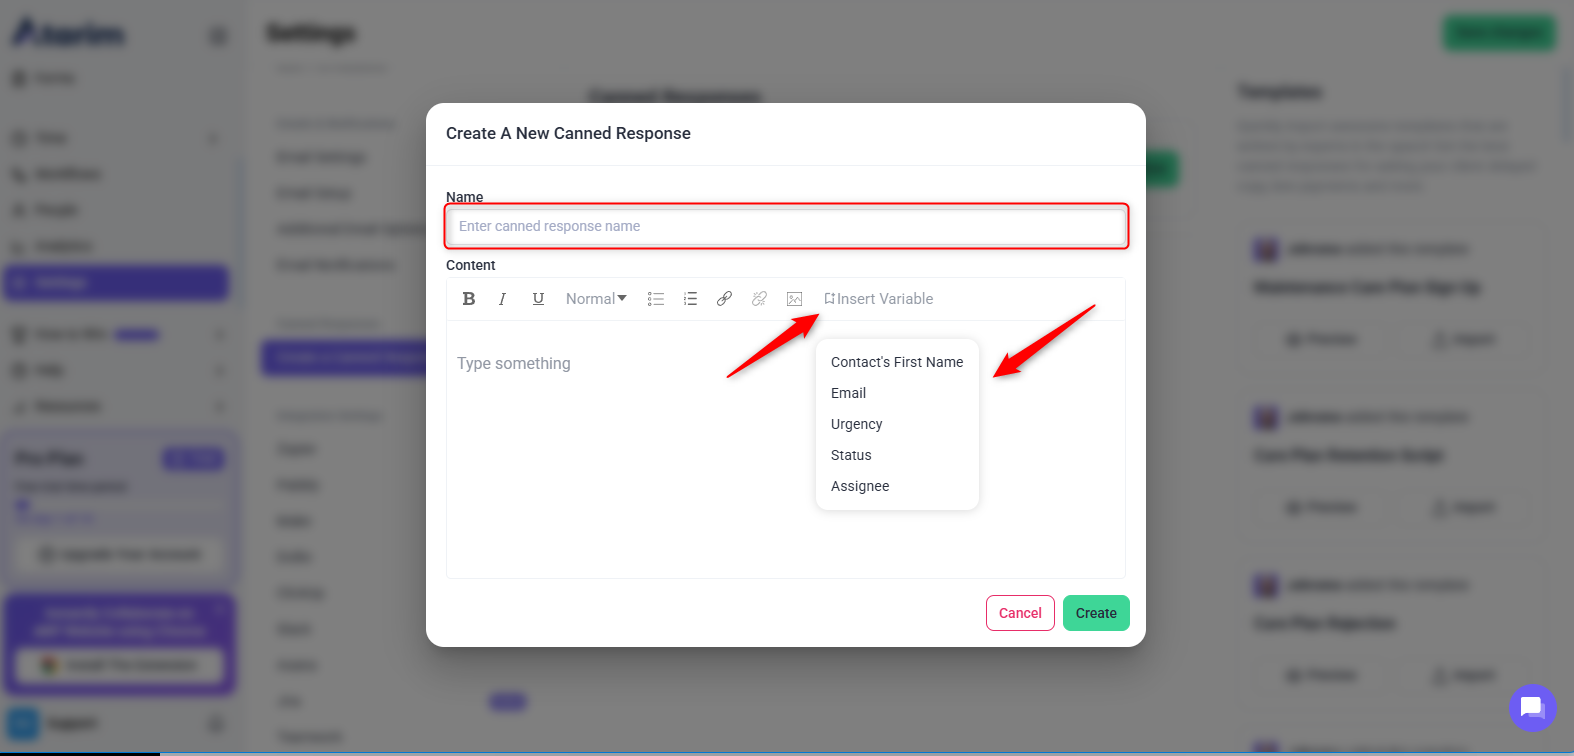
Set Up Your Canned Response:
Name – Define a recognizable name for the snippet.
Content – Write the message you’ll send to recipients.
Use Variables – Insert placeholders like:
Contact’s First Name
Email
Assignee’s Name
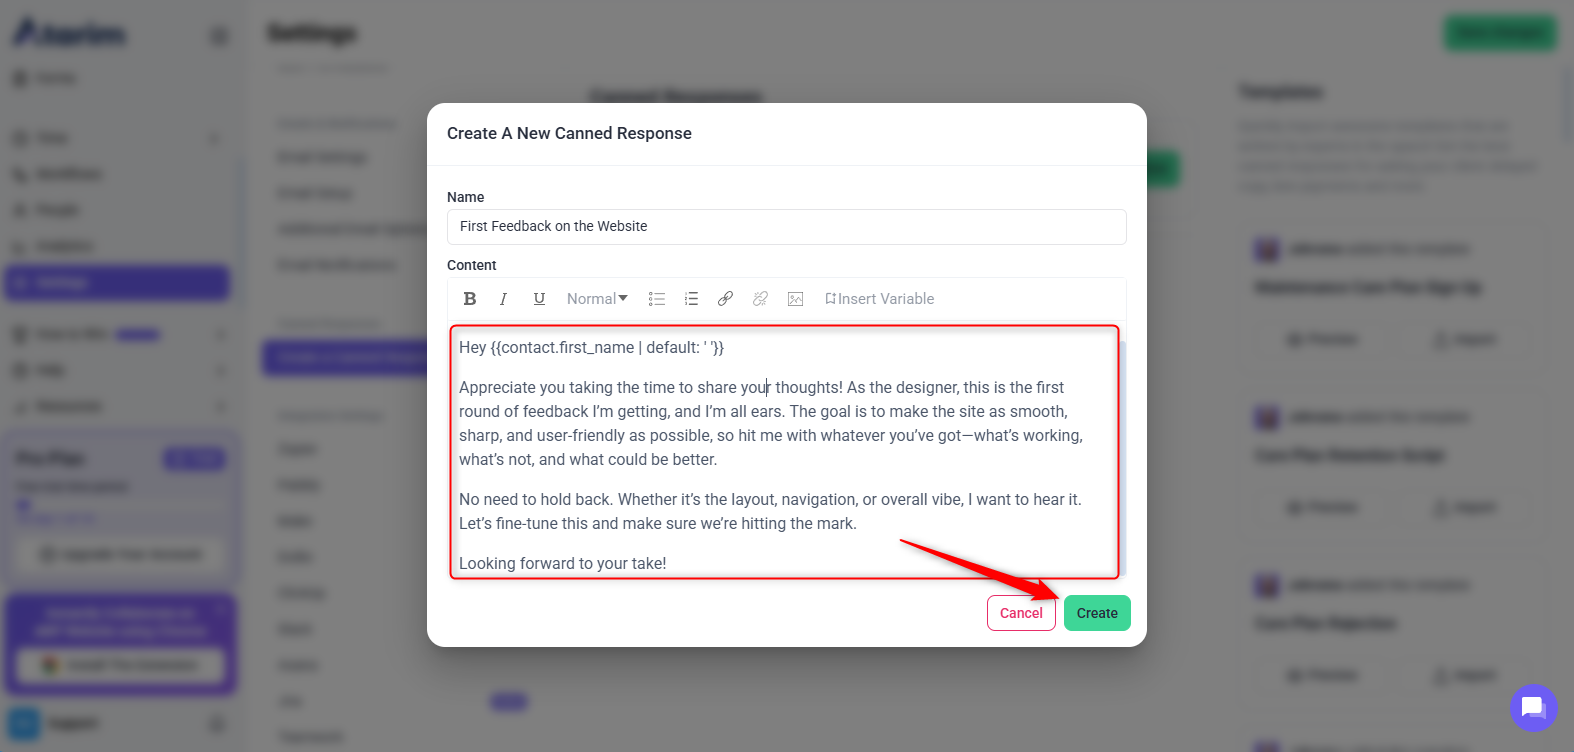
Save Your Snippet:
Click Create to finalize your canned response.
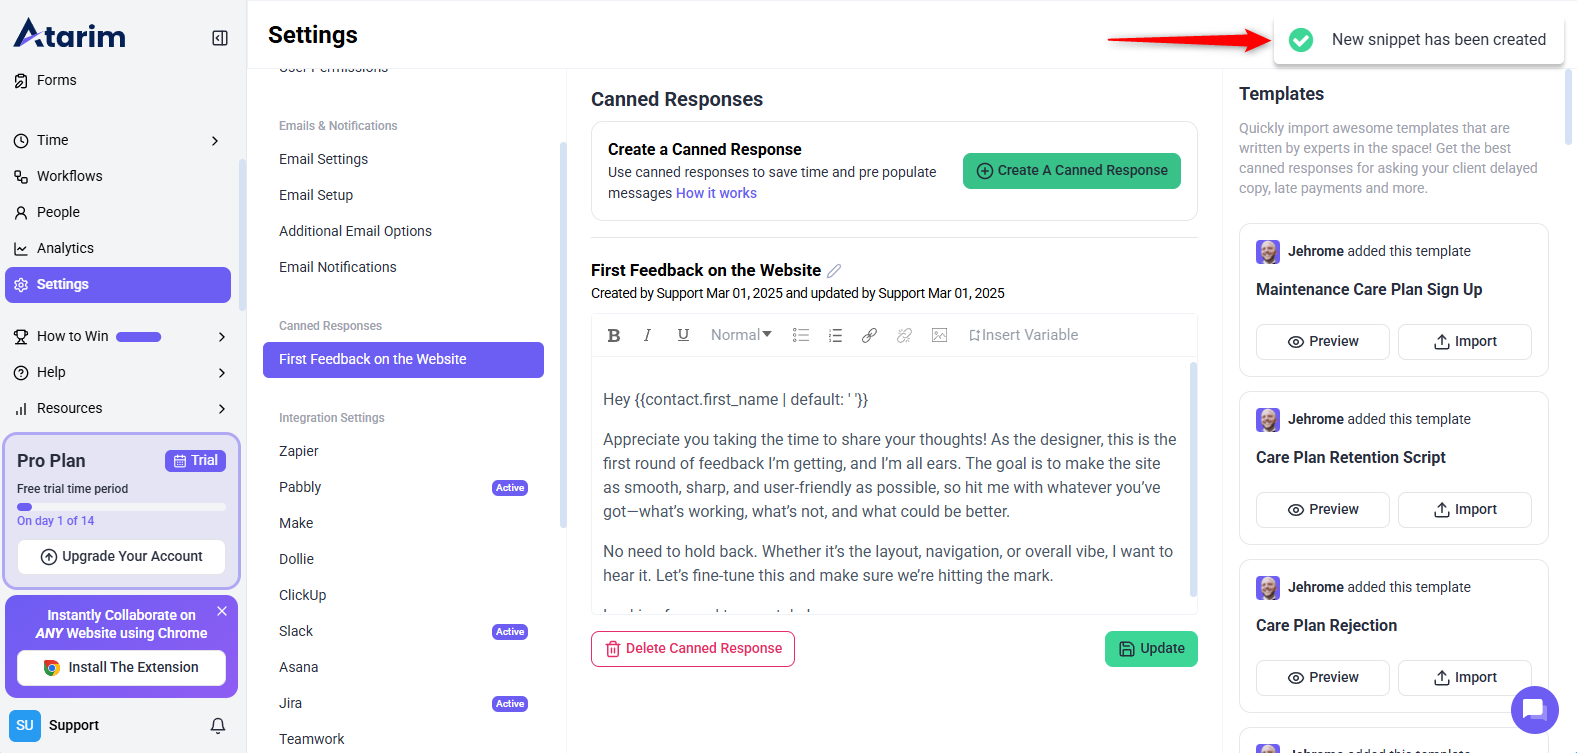
Create a Canned ResponseSet Up Your Canned ResponseSave Your SnippetAction Completed!
Tip: Use a clear naming convention (e.g., “Client Feedback Follow-Up” or “Bug Report Response”) for easy identification.
Using a Canned Response
Open the Inbox or Task Panel:
Navigate to the Inbox tab or any task within your Atarim dashboard.
Canned responses work in emails and tasks in visual collaboration.
Insert a Canned Response:
Click the Canned Responses button.
Select the canned response you want to use.
Click Insert Canned Response to populate the message.
Send or Edit as Needed:
Make any necessary changes before sending the response.
Insert Canned Response
Note: Canned responses help maintain consistency and reduce response time across all communication channels.
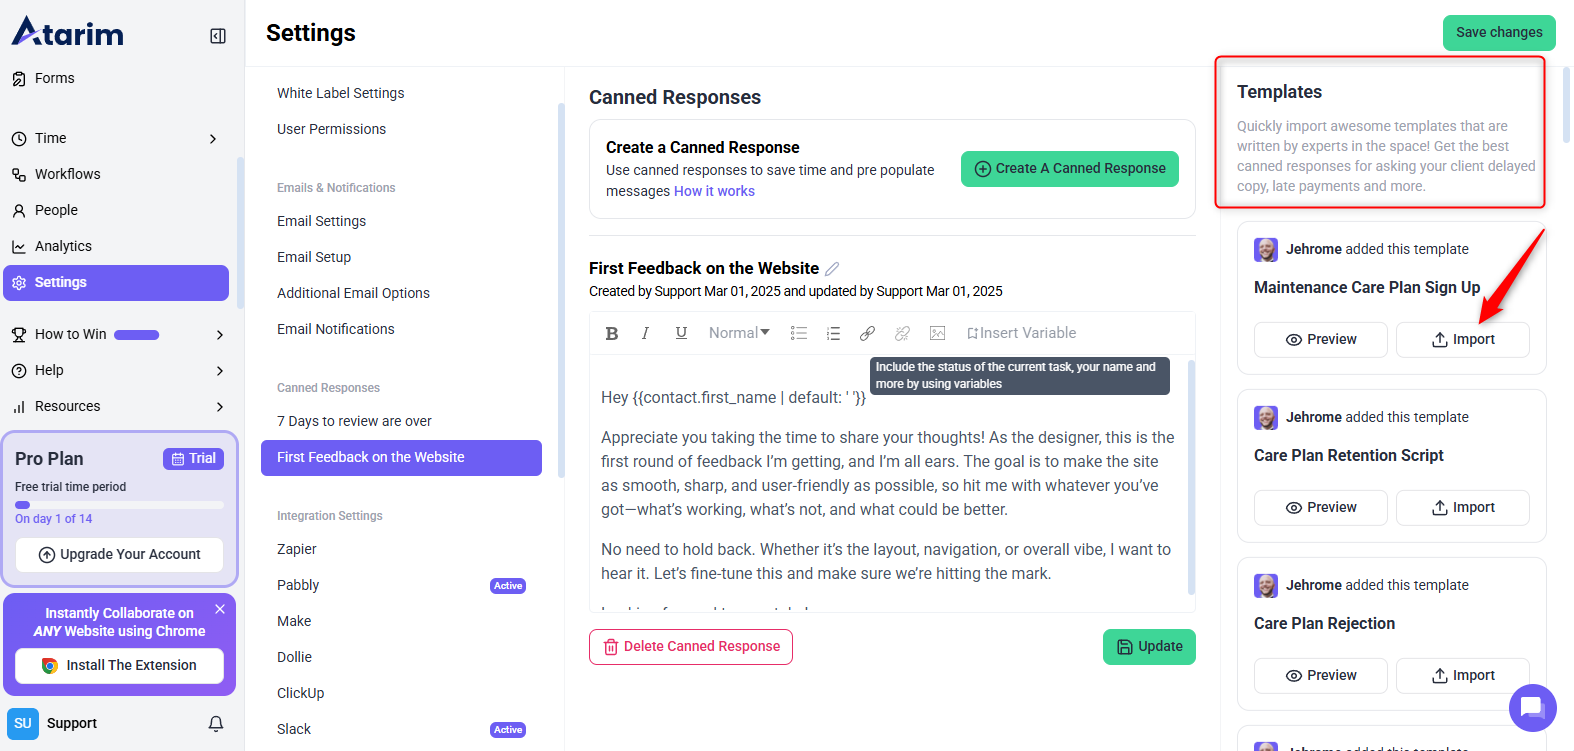
Using Prebuilt Templates
Browse Available Templates:
On the right-hand side of the Canned Responses page, click Preview on one of the prebuilt templates.
Import the Template:
If you’d like to use a template, click Import.
Modify as Needed:
Update the content to fit your specific needs before saving it as your own.
Import the Template
Tip: Prebuilt templates save time and ensure best practices in communication.
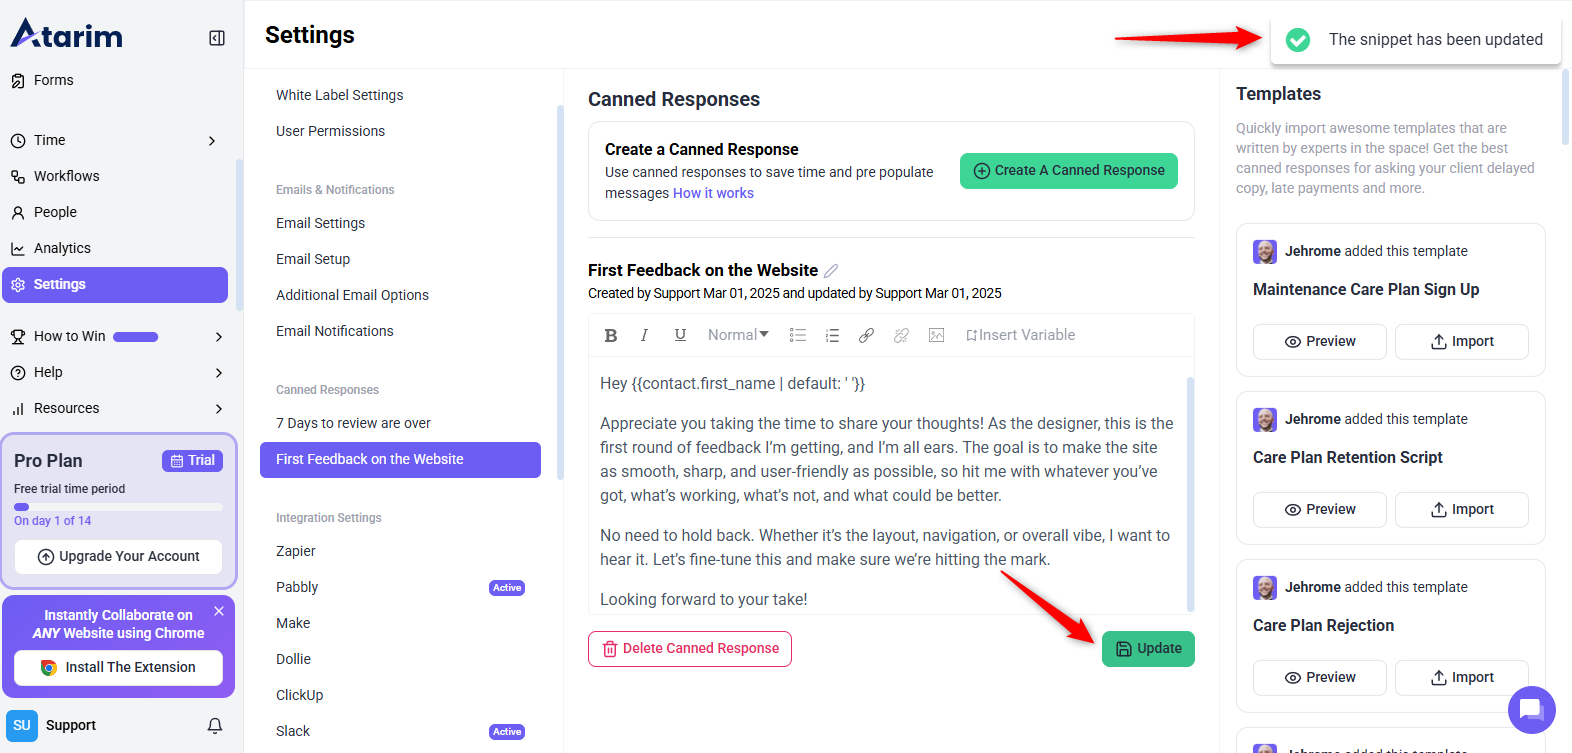
Editing a Canned Response
Go to Settings → Canned Responses.
Select the Canned Response you want to update.
Make Your Changes and click Update.
A confirmation message appears:“Snippet has been successfully updated.”
Editing Canned Response
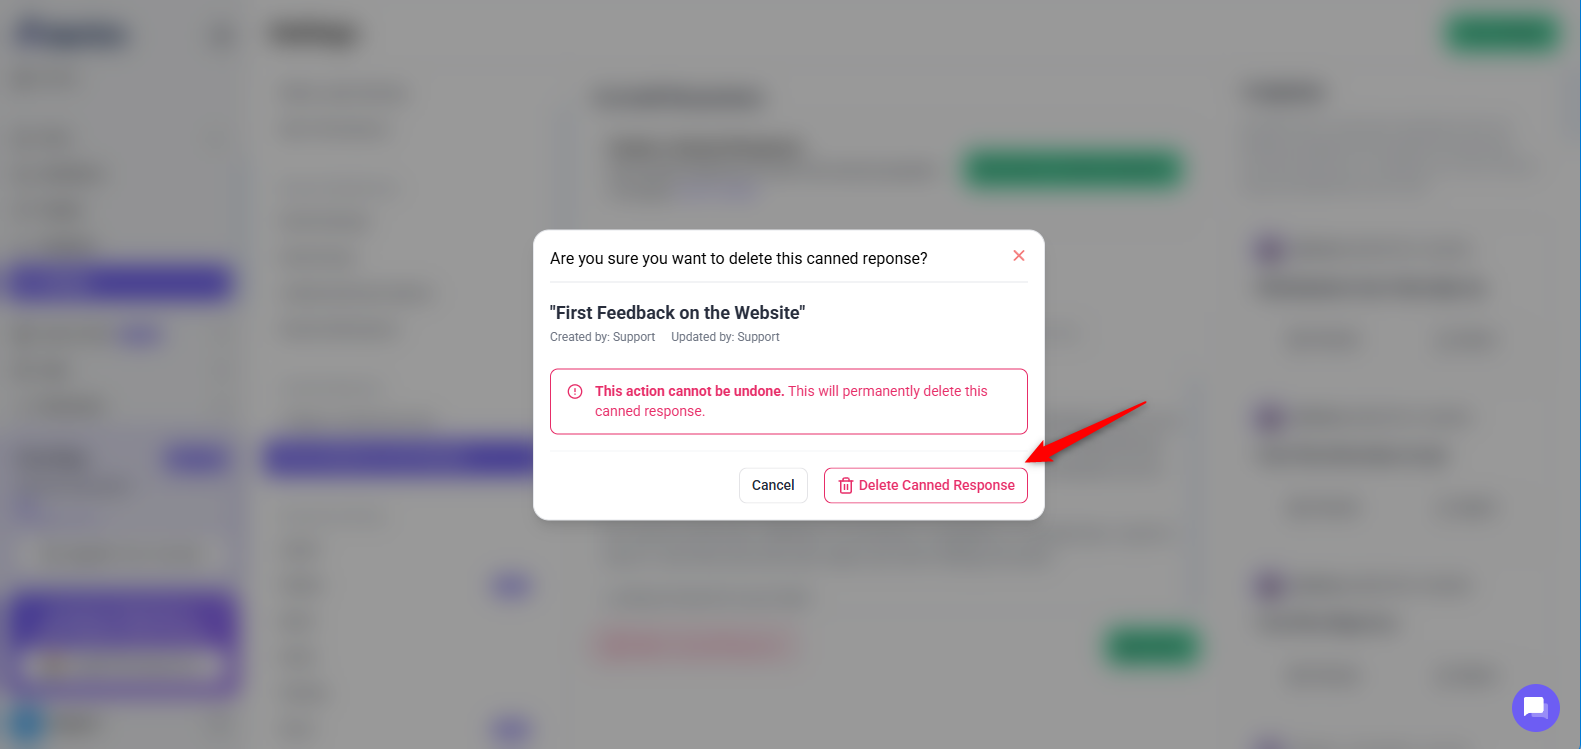
Deleting a Canned Response
Go to Settings → Canned Responses.
Choose the response you want to delete.
Click Delete Canned Response.
A confirmation pop-up appears:“This action cannot be undone. This will permanently delete this canned response.”
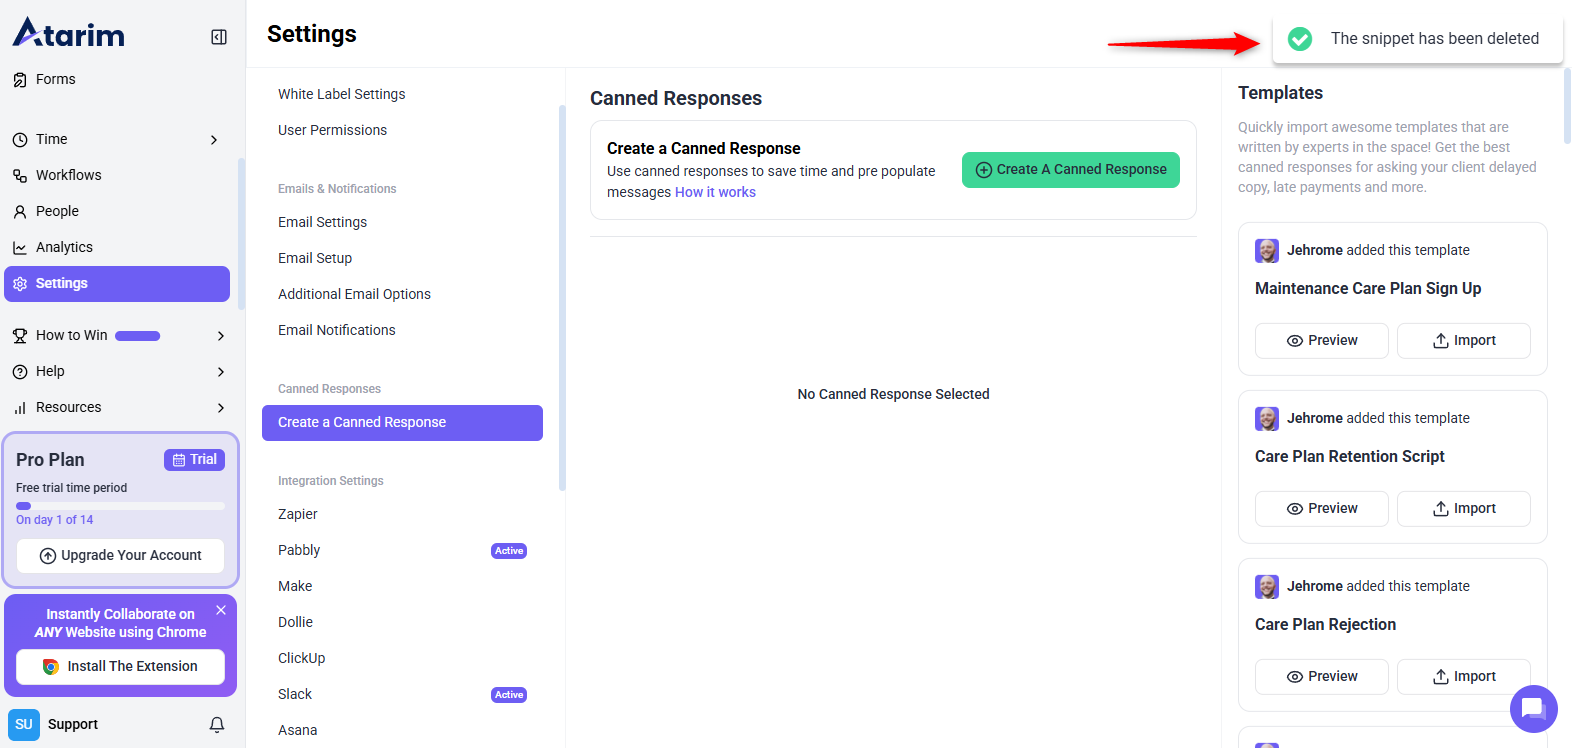
Confirm deletion.
A success message appears:“Snippet has been successfully deleted.”
Delete Canned ResponseSnippet has been successfully deleted.
Warning: Deleting a canned response permanently removes it from the system.
Tips & Tricks
Standardize answers for frequently asked questions.
Speed up the reporting process with structured templates.
Automate follow-ups and progress updates.
Quickly relay updates without rewriting responses.
Summary
By using canned responses in Atarim, you can significantly improve communication efficiency, maintain consistency across messages, and reduce response time for repetitive interactions. Whether handling client queries, internal task updates, or QA reports, canned responses streamline your workflow and free up time for more critical tasks.
Was This Helpful?
Did this article help you accomplish what you were looking for?
If yes, let us know that we nailed it! If not so much, we also want to know so that we can improve!
On This Page
Add a header to begin generating the table of contents
We use cookies on our website to give you the most relevant experience by remembering your preferences and repeat visits. By clicking “Accept All”, you consent to the use of ALL the cookies. However, you may visit "Cookie Settings" to provide a controlled consent.
This website uses cookies to improve your experience while you navigate through the website. Out of these, the cookies that are categorized as necessary are stored on your browser as they are essential for the working of basic functionalities of the website. We also use third-party cookies that help us analyze and understand how you use this website. These cookies will be stored in your browser only with your consent. You also have the option to opt-out of these cookies. But opting out of some of these cookies may affect your browsing experience.
Necessary cookies are absolutely essential for the website to function properly. These cookies ensure basic functionalities and security features of the website, anonymously.
Cookie
Duration
Description
__stripe_mid
1 year
This cookie is set by Stripe payment gateway. This cookie is used to enable payment on the website without storing any patment information on a server.
__stripe_sid
30 minutes
This cookie is set by Stripe payment gateway. This cookie is used to enable payment on the website without storing any patment information on a server.
cookielawinfo-checkbox-advertisement
1 year
The cookie is set by GDPR cookie consent to record the user consent for the cookies in the category "Advertisement".
cookielawinfo-checkbox-analytics
11 months
This cookie is set by GDPR Cookie Consent plugin. The cookie is used to store the user consent for the cookies in the category "Analytics".
cookielawinfo-checkbox-functional
11 months
The cookie is set by GDPR cookie consent to record the user consent for the cookies in the category "Functional".
cookielawinfo-checkbox-necessary
11 months
This cookie is set by GDPR Cookie Consent plugin. The cookies is used to store the user consent for the cookies in the category "Necessary".
cookielawinfo-checkbox-others
11 months
This cookie is set by GDPR Cookie Consent plugin. The cookie is used to store the user consent for the cookies in the category "Other.
cookielawinfo-checkbox-performance
11 months
This cookie is set by GDPR Cookie Consent plugin. The cookie is used to store the user consent for the cookies in the category "Performance".
elementor
never
This cookie is used by the website's WordPress theme. It allows the website owner to implement or change the website's content in real-time.
PHPSESSID
session
This cookie is native to PHP applications. The cookie is used to store and identify a users' unique session ID for the purpose of managing user session on the website. The cookie is a session cookies and is deleted when all the browser windows are closed.
viewed_cookie_policy
11 months
The cookie is set by the GDPR Cookie Consent plugin and is used to store whether or not user has consented to the use of cookies. It does not store any personal data.
wordpress_test_cookie
session
This cookie is used to check if the cookies are enabled on the users' browser.
Functional cookies help to perform certain functionalities like sharing the content of the website on social media platforms, collect feedbacks, and other third-party features.
Cookie
Duration
Description
aka_debug
session
This cookie is set by the provider Vimeo.This cookie is essential for the website to play video functionality. The cookie collects statistical information like how many times the video is displayed and what settings are used for playback.
bp_user-registered
13 years 8 months 8 days
This cookie is used to set which users can access the private pages of the website. It is a functional cookie.
bp_user-role
13 years 8 months 8 days
This is a functional cookie. It is used to set restriction to the user on acessing certain pages like back office, account page etc.
bp_ut_session
13 years 8 months 8 days
This is a functional cookie. This cookie is used to set restriction to the user on acessing certain pages like back office, account page etc.
player
1 year
This cookie is used by Vimeo. This cookie is used to save the user's preferences when playing embedded videos from Vimeo.
Performance cookies are used to understand and analyze the key performance indexes of the website which helps in delivering a better user experience for the visitors.
Cookie
Duration
Description
_fs
16 years 4 months 18 days 5 hours 26 minutes
This cookie is provided by Google Tag Manager. This cookie is used for collecting information on user preferences and the behaviour with web campaign content. This is used by website owners for promoting products and events.
Analytical cookies are used to understand how visitors interact with the website. These cookies help provide information on metrics the number of visitors, bounce rate, traffic source, etc.
Cookie
Duration
Description
_ga
2 years
This cookie is installed by Google Analytics. The cookie is used to calculate visitor, session, campaign data and keep track of site usage for the site's analytics report. The cookies store information anonymously and assign a randomly generated number to identify unique visitors.
_gat_gtag_UA_187048114_1
1 minute
This cookie is set by Google and is used to distinguish users.
_gid
1 day
This cookie is installed by Google Analytics. The cookie is used to store information of how visitors use a website and helps in creating an analytics report of how the website is doing. The data collected including the number visitors, the source where they have come from, and the pages visted in an anonymous form.
_hjAbsoluteSessionInProgress
30 minutes
No description available.
_hjFirstSeen
30 minutes
This is set by Hotjar to identify a new user’s first session. It stores a true/false value, indicating whether this was the first time Hotjar saw this user. It is used by Recording filters to identify new user sessions.
_hjid
1 year
This cookie is set by Hotjar. This cookie is set when the customer first lands on a page with the Hotjar script. It is used to persist the random user ID, unique to that site on the browser. This ensures that behavior in subsequent visits to the same site will be attributed to the same user ID.
_hjIncludedInPageviewSample
2 minutes
No description available.
CONSENT
16 years 4 months 18 days 5 hours 24 minutes
These cookies are set via embedded youtube-videos. They register anonymous statistical data on for example how many times the video is displayed and what settings are used for playback.No sensitive data is collected unless you log in to your google account, in that case your choices are linked with your account, for example if you click “like” on a video.
vuid
2 years
This domain of this cookie is owned by Vimeo. This cookie is used by vimeo to collect tracking information. It sets a unique ID to embed videos to the website.
Advertisement cookies are used to provide visitors with relevant ads and marketing campaigns. These cookies track visitors across websites and collect information to provide customized ads.
Cookie
Duration
Description
_fbp
3 months
This cookie is set by Facebook to deliver advertisement when they are on Facebook or a digital platform powered by Facebook advertising after visiting this website.
fr
3 months
The cookie is set by Facebook to show relevant advertisments to the users and measure and improve the advertisements. The cookie also tracks the behavior of the user across the web on sites that have Facebook pixel or Facebook social plugin.
IDE
1 year 24 days
Used by Google DoubleClick and stores information about how the user uses the website and any other advertisement before visiting the website. This is used to present users with ads that are relevant to them according to the user profile.
test_cookie
15 minutes
This cookie is set by doubleclick.net. The purpose of the cookie is to determine if the user's browser supports cookies.
VISITOR_INFO1_LIVE
5 months 27 days
This cookie is set by Youtube. Used to track the information of the embedded YouTube videos on a website.
YSC
session
This cookies is set by Youtube and is used to track the views of embedded videos.
yt-remote-connected-devices
never
These cookies are set via embedded youtube-videos.
yt-remote-device-id
never
These cookies are set via embedded youtube-videos.
yt.innertube::nextId
never
These cookies are set via embedded youtube-videos.
yt.innertube::requests
never
These cookies are set via embedded youtube-videos.